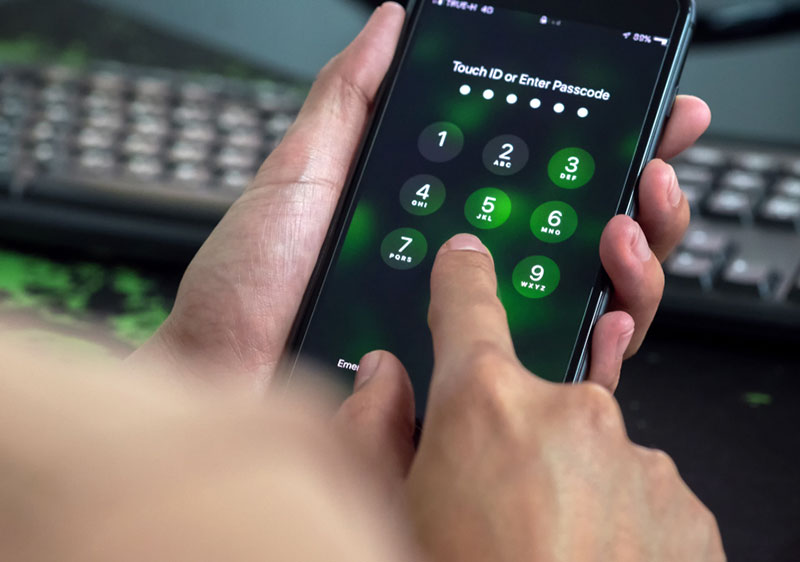
How to unlock a disabled iPhone without iTunes? The maximum irritating scenario you could ever have together with your iPhone or iPad is whilst your tool receives disabled or locked for no unique cause and you’ve got all of your statistics sitting on it. Even though the tool is proper there for your hands, you’re helpless as you couldn’t get admission to a piece of your statistics without first allowing your tool. However, there’s one factor you could do without allowing your tool this is to reset your tool.
Most publications on the Internet inform you to apply the iTunes app to reset your tool. However, you do produce other greater selections to reset your disabled iPhone iPad without iTunes. In this manual, you’re going to examine pretty much a way to reset the disabled or locked iPhone iPad without iTunes. The following manner has to be painted on maximum iPhone and iPad models, along with iPhone 11(Pro)/XS/XR/X/8/7/6/five/4, iPad Air/Pro/mini.
How to unlock Disabled or Locked iPhone iPad without iTunes
Here, we can share with you five most secure strategies to manufacture unit reset of a locked iPhone or iPad without iTunes. You can undergo this manual firstly, after which select one in every of 4 strategies to complete the challenge in step with your scenario.
Method 1. How to unlock Disabled iPhone/iPad without iTunes Or iCloud
Restoring from iCloud backup will erase all statistics and settings (along with the display screen password) in your tool. So, in case you overlook your password or after a restrained instance of incorrect passcode, attempt iCloud to reset your tool. But it’s really well worth reminding that every one preceding statistics in your tool may be wiped and changed with iCloud backup documents. If you’ve got saved a few vital documents which have now no longer been subsidized as much as iCloud, you’d better attempt different strategies.
Visit iCloud.com in your pc
log in with the equal Apple ID used at the disabled iPhone tool.
Go to Settings
Choose Restore and select the backup incorporating all of your statistics on the tool
Click on Restore.
After the technique completes, you may get a modern tool, however all of your statistics may be included via means of the iCloud backup documents.
Method 2. How to Factory Reset Locked iPhone or iPad without iTunes or Find my iPhone:
Find My iPhone function in iCloud may be used to locate, lock or reset your iDevice remotely. Just observe the under steps to reset your disabled iPhone iPad with it.
Afterward, your tool will reset back to manufacturing unit settings and all statistics may be removed.
Method 3. How to Reset Disabled iPhone/iPad without iTunes OR AnyFix
As one of the pinnacle iOS device healing software programs, AnyFix is capable of resetting your locked or disabled iPhone to manufacturing unit resetting inside a few easy clicks in case you don’t don’t forget the display screen passcode or your face identity notification or contact identity notification now no longer working. Besides, AnyFix can also restore 200+ iOS device problems and 130+ iTunes problems. So if you acquire different troubles whilst the use of your Apple tool, AnyFix will assist you a lot. Now let’s begin to reset your tool for the use of this application.
Download and deploy AnyFix in your pc, this application works properly on each PC and Mac.
Connect your tool to pc, run AnyFix and visit Reset Device tool.
Select Hard Reset mode for resetting your locked or disabled device.
This mode is appropriate for folks who forgot the display screen passcode.
Note that this mode will take a touch longer and could erase all statistics and settings.
Just observe the onscreen commands to place your tool to Recovery Mode after which download the firmware primarily based totally in your tool.
The download technique may also take a few minutes.
After that, AnyFix will routinely reset your tool to manufacturing unit reset.
And withinside the end, your tool may be reset to a brand new one.
you may get a Reset Completed web page at the software program interface
Method 4. Factory Reset Locked iPhone/iPad without iTunes OR PhoneRescue for iOS
To unlock a disabled iphone without itunes, the best way to have manners is to take advantage of a few expert reset tools, which might be capable of effectively reset your tool. And PhoneRescue for iOS is a utility constructed to cope with instances much like yours. The app permits you to restore a few of the problems for your tool’s running device and it additionally enables you to get better statistics whilst your tool is being repaired.
More importantly, PhoneRescue for iOS presents you with a choice wherein you could select whether or not you would love to erase your statistics or now no longer whilst resetting. Also, the interface of the stated app is so easy and smooth to apply that you don’t want an expert’s recommendation to restore or reset your iOS tool.
Download PhoneRescue and join your tool.
Free Download PhoneRescue for iOS in your pc
Connect your tool in your pc through a USB cable >Click on iOS Repair Tools mode > Click on Right Arrow.
Choose restore mode.
It presents reset modes – Standard Mode and Advanced Mode, pick one mode you prefer. With Standard Mode, your iOS device may be up to date to the state-of-the-art model and all tool statistics may be absolutely erased. With Advanced Mode, the statistics in your tool won’t be erased.
Enter in “Recovery” mode.
Follow the 3-step preparation because the screenshot suggests to go into the “Recovery” mode.
Download firmware.
After entering “Recovery” mode, take a look at your tool data > Click the “Download” button to download the firmware to your iPhone.
Repair your tool regularly.
After downloading technique completes, PhoneRescue will restore your iPhone to regular and reset routinely. Do now no longer disconnect your iPhone till it reboots.
Method five. Reset Disabled iPhone/iPad without iTunes – Siri (iOS 8 – 11)
Press and hold the Home button to release Siri
Ask Siri “What time is it?” and it’ll inform you the time
Tap at the clock that appears.
Then, you may see the World Clock display screen, faucet on “+” button at the pinnacle-proper to feature a brand new clock.
Type a town call on the subsequent display screen
Type whatever withinside the textual content field
Tap and keep at the textual content and select “Select All”
Choose “Share”, and you’ll be requested the way you would love to percentage the chosen textual content
Just select “Message”.
Enter any random data on the subsequent display screen after which faucet at the “+” (plus) icon is observed via the means of Create New Contact
Tap on upload image to feature an image for the touch and it’ll open the Photos app.
Wait for a whilst, after which press the Home button.
Your disabled iPhone or iPad have to be unlocked now.
The Bottom Line
You won’t be capable of using the integrated choice to reset your iPhone or iPad in case your tool has been disabled. The above manual has to offer you with a technique to reset your disabled or locked tool without the use of iTunes or the inaccessible integrated reset function. If you locate this manual useful, simply download AnyFix to have a try so you could additionally percentage it to assist greater customers who’re caught withinside the equal scenario.
Features of macbook pro refurbished 13.3 inch-Space Gray:
All systems Pro.
With up to 2.8x CPU performance. Up to 5x the graphics speed. Our most advanced Neural Engine. up to 11x faster machine learning. And up to twenty hours of battery life — the longest of any Mac ever. It’s our hottest pro notebook, taken to an entire new level.
Creates beauty, sort of a beast.
And it brings the world’s fastest integrated graphics during a pc
2 delivering a 5x boost in graphics horsepower.
Biggest collection of apps ever.
Run powerful apps built for M1. all of your existing apps work because of Rosetta 2. And for the primary time, you’ll use your favorite iPhone and iPad apps directly on macOS Big Sur .
Speed and responsiveness.
MacBook Pro wakes instantly from sleep. And your hardest-working apps all have access to the facility they have .
Serious performance. Ridiculous battery life.
M1 extends battery life even while bringing a huge increase in performance. But the chip itself is merely a part of this incredible power efficiency story. macOS Big Sur comprises advanced power management. Its efficiency cores automatically optimize for lightweight tasks e.g reading a note or performance-intensive tasks like playing the newest game. The results are the simplest battery life ever on a Mac.
An entire system. On one chip.
Until now, a Mac needed multiple chips to deliver all of its features including the processor, security, and memory. with small transistors measured at an atomic scale, M1 is remarkably complex, packing the most important number of transistors we’ve ever put into one chip. It’s also the primary pc chip built using industry‑leading 5‑nanometer process technology.
Unified memory. Shared across the whole system.
M1 also features unified memory architecture, or UMA. M1 unifies its high bandwidth, low latency memory within a custom package. all of the technologies within the SoC can access an equivalent data without copying it on pools of memory. This dramatically improves performance and power efficiency. Video apps are snappier. Games are richer and more detailed. Image processing is lightning fast. And your entire system is more and responsive.
The world’s fastest integrated graphics computer .
Typically, PCs need to use a discrete chip to urge great graphics performance — which consumes tons of power. But M1 is different. Its integrated graphics bring the simplest of both worlds — an enormous increase in graphics performance alongside low power consumption. The results of thorough analysis of Mac applications is that the GPU in M1 is the most advanced graphics processor Apple ever built. With up to eight GPU cores. It is capable of executing nearly “25,000” threads at a time.
16-core Neural Engine. Smarts, meet speed.
Machine learning brings tasks smashing speed. It also enhance automation to video analysis, voice recognition & many more. and therefore the M1 chip with 16‑core Neural Engine and full stack of technologies takes ML performance on MacBook Pro into the stratosphere.
Magic Keyboard. Just your type.
Magic Keyboard allows you to do everything faster and more efficiently. The refined scissor mechanism delivers a responsive and quiet typing experience. The Touch Bar puts the commands you would like most right where you would like them, saving time and keystrokes. Touch ID provides fast and more easy authentication for secure logins and purchases.
Touch ID.
A touch on the sensor unlocks your Mac. a press locks it. You can Use your fingerprint to rent movies or access things like locked documents or system settings without having to reenter your password. And once you shop online with Apple Pay, Touch ID automatically fills in your shipping and billing information without sharing your card details.
Tech Specs of macbook pro refurbished 13.3 inch-Space Gray
Chip
Apple M1 chip
8-core CPU
4 performance cores
4 efficiency cores
8-core GPU
16-core Neural Engine
Memory
8GB unified memory
Display
Retina display
13.3‑inch (diagonal) LED-backlit display
IPS technology
2560‑by‑1600 native resolution
227 pixels per inch
support for many colors
Supported scaled resolutions:
1680 x 1050
1440 x 900
1024 x 640
500 nits brightness
Wide color (P3)
True Tone technology
Storage
256GB SSD1
Charging and Expansion
Two Thunderbolt and USB 4 ports with support for:
Charging
DisplayPort
Thunderbolt 3 (up to 40Gb/s)
USB 4 (up to 40Gb/s)
USB 3.1 Gen 2 (up to 10Gb/s)
Video Support and Camera
720p FaceTime HD camera
Simultaneously supports full native resolution:
One external display
up to 6K resolution at 60Hz
Thunderbolt 3 digital video output
Native DisplayPort output over USB‑C
VGA, DVI,HDMI and Thunderbolt 2 output using adapters
Power and Battery
Up to 17 hours wireless web
Up to twenty hours Apple TV app movie playback
Built-in 58.2‑watt‑hour lithium‑polymer battery4
61W USB-C Power Adapter
Audio
Stereo speakers with high dynamic range
Wide stereo sound
Support for Dolby Atmos playback
Studio quality three mic array
high signal-to-noise
directional‑beamforming
3.5mm headphone jack
Wireless
802.11ax Wi-Fi 6 wireless networking
IEEE 802.11a/b/g/n/ac compatible
Bluetooth 5.0 wireless technology
Size and Weight
Height: 0.61 inch (1.56 cm)
Width: 11.97 inches (30.41 cm)
Depth: 8.36 inches (21.24 cm)
Weight: 3.0 pounds (1.4 kg)5
Macbook pro refurbished 13.3 inch-Silver , Apple M1 Chip with 8‑Core CPU and 8‑Core GPU – Silver
MacBook pro refurbished 13.3 inch-Silver price: $1,099.00
Overview
Originally released November 2020
13.3-inchLED-backlit display with IPS technology; 2560-by-1600 native
8GB unified memory
256GB SSD1
Touch Bar and Touch ID
720p FaceTime HD Camera
What’s within the Box
macbook pro refurbished
61W USB-C Power Adapter
USB-C Charge Cable (2 m)
Features of macbook pro refurbished 13.3 inch-Silver:
All systems Pro.
The Apple M1 chip gives the 13‑inch MacBook Pro speed and power. With up to 2.8x CPU performance. Up to 5x the graphics speed. Our most advanced Neural Engine. up to 11x faster machine learning.up to twenty hours of battery life the longest of any Mac ever. It’s our hottest pro notebook, taken to an entire new level.
Creates beauty, sort of a beast.
And it brings the world’s fastest integrated graphics during a pc
2 delivering a 5x boost in graphics horsepower.
Biggest collection of apps ever.
Run powerful apps built for M1. all of your existing apps work because of Rosetta 2. And for the primary time, you’ll use your favorite iPhone and iPad apps directly on macOS Big Sur.
Speed and responsiveness.
MacBook Pro wakes instantly from sleep. And your hardest-working apps all have access to the facility they have .
Serious performance. Ridiculous battery life.
M1 extends battery life even while bringing a huge increase in performance. But the chip itself is merely a part of this incredible power efficiency story. macOS Big Sur comprises an advanced power management. Its efficiency cores automatically optimize for lightweight tasks e.g reading a note or performance intensive tasks like playing the newest game. The results are the simplest battery life ever on a Mac.
An entire system. On one chip.
Until now, a Mac needed multiple chips to deliver all of its features including the processor,security, and memory. with a small transistors measured at an atomic scale, M1 is remarkably complex, packing the most important number of transistors we’ve ever put into one chip. It’s also the primary pc chip built using industry‑leading 5‑nanometer process technology.
Unified memory. Shared across the whole system.
M1 also features unified memory architecture, or UMA. M1 unifies its high bandwidth, low latency memory within a custom package. All of the technologies within the SoC can access an equivalent data without copying it on pools of memory. This dramatically improves performance and power efficiency. Video apps are snappier. Games are richer and more detailed. Image processing is lightning fast. And your entire system is more and more responsive.
The world’s fastest integrated graphics computer .
Typically, PCs need to use a discrete chip to urge great graphics performance which consumes tons of power. But M1 is different. Its integrated graphics bring the simplest of both worlds an enormous increase in graphics performance alongside low power consumption. With up to eight GPU cores. It is capable of executing nearly “25,000” threads at a time. From teraflops to texture bandwidth to fill rate power efficiency, this GPU is a class of its own and brings the world’s fastest integrated graphics.
16-core Neural Engine. Smarts, meet speed.
Machine learning brings tasks smashing speed. It also enhance automation to video analysis, voice recognition & many more. and therefore the M1 chip with 16‑core Neural Engine and full stack of technologies takes ML performance on MacBook Pro into the stratosphere.
Magic Keyboard. Just your type.
Magic Keyboard allows you to do everything faster and more efficiently. The refined scissor mechanism delivers a responsive and quiet typing experience. The Touch Bar puts the commands you would like most right where you would like them, saving time and keystrokes. Touch ID provides fast and more easy authentication for secure logins and purchases.
Touch ID.
A touch on the sensor unlocks your Mac. a press locks it. You can Use your fingerprint to rent movies or access things like locked documents or system settings without having to reenter your password. And once you shop online with Apple Pay, Touch ID automatically fills in your shipping and billing information without sharing your card details.
Tech Specs macbook pro refurbished 13.3 inch-Silver:
AirDrop may be fast and straightforward thanks to sharing images, documents, and other files between Apple devices. But before you employ it, you will need to activate airdrop on iphone.
The AirDrop feature is usually the quickest thanks to transfer content between iPhone, iPad, iPod touch, and Mac. And beyond sharing images and documents, users also can AirDrop website links, passes from Wallet, Apple Maps locations, and just about anything which will be shared via Share sheet.
How Does AirDrop Work?
AirDrop actually uses Bluetooth to make a WiFi network between two Apple devices. So, to use AirDrop, you’ve got to possess two Apple devices that are within Bluetooth range, which is about 30 feet, consistent with Apple.
Both devices also will have Bluetooth and WiFi turned on, and AirDrop enabled.
Activate AirDrop on iPhone and iPad
Enabling AirDrop on Apple’s mobile devices is straightforward and only involves a couple of steps.
Before you start, don’t forget to confirm that Wi-Fi and Bluetooth are enabled on both the sending and receiving devices. Also, close up Personal Hotspot.
Turning on AirDrop within the iOS center
Open the center on your device by swiping down from the upper-right corner, or swiping up from rock bottom .
Press and hold on the tray that contains the Wi-Fi, Airplane Mode, and Bluetooth buttons.
tap on the AirDrop button.
Select either “Contacts Only” or “Everyone.”
The AirDrop button should now be colored Blue, indicating that it’s enabled.
You may not be ready to send or receive content via AirDrop directly , counting on whether you chose “Contacts Only” or “Everyone.”
For the primary option, both devices will have to be signed into an iCloud account. The e-mail addresses or phone numbers related to the sending device must be within the Contacts app on the receiving device.
The “Everyone” setting, on the opposite hand, doesn’t have any prerequisites. Due to that, it is a good idea to go away in most cases.
Enabling AirDrop on Mac
Turning on AirDrop on a Mac is equally as simple, but you will need to make sure that both Wi-Fi and Bluetooth are enabled on your system.
You can activate Bluetooth and Wi-Fi from the top menu bar.
Just click on the respective icon and confirm the toggle is switched on.
Alternatively, if Bluetooth or Wi-Fi isn’t in your menu bar, you’ll head into System Preferences and choose Networks or Bluetooth to enable your connectivity settings.
Once Bluetooth and Wi-Fi are on, you’ll plow ahead and enable AirDrop.
On macOS Big Sur and later, you’ll do this from the center.
Turning on AirDrop within the macOS center
Click on the center icon within the top menu bar.
Click on AirDrop.
Make sure the toggle is about to go on.
You’ll also have to specify your AirDrop setting to “Contacts Only” or “Everyone.”
On older versions of macOS that do not feature the center , the simplest thanks to enable AirDrop is in Finder.
Turning on AirDrop in Finder
Open a replacement Finder window.
Click on the AirDrop folder.
Click on the tiny dropdown menu next to “Allow me to be discovered by:”
Select either “Contacts Only” or “Everyone.”
Whether you used center or Finder, you ought to now be ready to send and receive files via AirDrop on your Mac. confine mind that the “Contacts Only” and “Everyone” settings on macOS function in an equivalent way they are doing on iOS.
How to AirDrop From your iPhone to a Mac
To use AirDrop to transfer files from an iPhone to a different iPhone or Mac, open the file that you simply want to share on your iPhone. Then tap the Share button and choose AirDrop. Finally, choose the device you would like to send the file to.
Open a file on your iPhone that you simply want to AirDrop.
For instance, if you would like to share a photograph, you’ll open the Photos app or the Camera app.
Then tap the Share button.
This is often the icon that appears sort of like a box with an arrow pointing up.
you’ll find this icon in several parts of the screen, counting on what you’re trying to share.
you’ll also find it by tapping and holding text, images, and more.
Next, tap AirDrop. you’ll see this during a row alongside other apps.
Then choose the device that you simply want to send the files to. If the recipient is in your contacts list, you’ll see their name and photo next to their device.
Otherwise, you’ll only see a gray circle with the owner’s initials thereunder .
Finally, the files are going to be sent to the Downloads folder on a Mac.
How to AirDrop From Mac to iPhone
To use AirDrop Mac to an iPhone, open a Finder window and choose a file or folder. Then click the Share icon at the highest of the Finder window and choose AirDrop. Finally, choose the device you would like to send files to.
Select a file on your Mac that you simply want to AirDrop.
Then click the Share button at the highest of the Finder window. This is often the icon with the arrow pointing up out of a box. If this is often greyed out, confirm to pick the file you would like to AirDrop.
Next, select AirDrop.
double click the recipient from the list.
If you’re sharing a photograph or video, it’ll be sent to the Photos app on the iPhone.
Alternatively, you can also follow the steps below to send files from Mac:
Open a Finder window.
Then select AirDrop from the left sidebar. If you don’t see this within the left sidebar, select Finder and hit the Command + Coma keys on your keyboard at an equivalent time.
Then click the Sidebar tab
check the box next to AirDrop.
Finally, drag a file onto the profile image of the recipient you would like to send files to.
We hope you would like this article on how to activate airdrop on iphone?
How to Clean iPhone charging port? There are a couple of reasons that your iPhone won’t be charging properly; as discussed within the article “Why won’t my iPhone charge? You would possibly have to restart your phone. Also you should check the Lightning cable for kinks and breaks, and ensure your power source is functioning. If you check all those things and it still doesn’t work, it’s possible there’s enough debris in your port to stop the connector from making a solid connection.
Anytime you set it in a pocket or bag, small bits of dirt and dust, and maybe lint can find their way in. And once you insert the cable, that compresses and packs the dirt deep within the port. it’d become so fouled with debris that it stops working.
You should get a flashlight, or work under a bright LED desk lamp — the brighter the higher, since you would like to ascertain deep into the Lightning port.
And while you’ll want to start out with compressed gas, if you’re getting to insert anything into the port to tug out wedged-in dirt, there’s just one acceptable tool for the job: A toothpick. Never attempt to clean the Lightning port with anything harder than wood, like all kinds of pin or metal rod. There are delicate electronics within the port, and ramming it with a pointy metal pin can permanently damage it.
Power off your iPhone completely. you’ll open the Settings app then tap “General,” followed by “Shut Down.”
Holding the compressed gas upright (so it only blasts air, and doesn’t expel wet propellant) shoot a couple of short, controlled bursts into the port.
Turn your phone on and check out to charge it again. If it’s still not working, it is time to undertake the toothpick.
Together with your phone turned off, insert the toothpick into the port and lightly scrape it against the within wall of the port. Don’t try to apply pressure to the wall that’s closest to the front of the phone, because there are delicate pins there. Overall, it is vital to be gentle, because additionally to those pins, the edges are home to 2 small spring-mounted anchors that latch onto the Lightning port once you insert it (that’s why it “snaps” into place once you push the cable in). If you break anything, its charging days are going to be over permanently.
After using the toothpick for a short time , give the port another burst of compressed gas to assist remove anything you’ve loosened.
If you push dirt out.
turn the phone back on and check to charge it.
If it works, congratulations you’re now back in business. If it still doesn’t work, you’ll still try — carefully — or take it to an Apple service center for professional help.
We hope you will like our this article on How to Clean iPhone charging port?
How to delete albums on iPhone? Every iPhone and iOS device comes preloaded with a Photos app — where you’ll manage photos and videos you’ve taken or downloaded.
Photo albums are an excellent way to organize photos or videos from trips or events. However, when it involves deleting these photos, it can get tricky.
If you’ve synced your iPhone with iCloud or iTunes, deleting some albums might not be possible. However, albums created by the user are tons easier to delete.
How to delete albums from iPhone’s Photos app
Unlock your iPhone and open the Photos app — an icon that appears sort of a color circle .
Find “Albums” within the bar at rock bottom , and tap.
Under the massive , bold “Albums” heading, find the “See All” option off to the proper on the screen.
Next, click the “Edit” button within the top-right.
The albums you’ll delete should have an icon that appears sort of a red circle with a line in it at the highest left. Toggle or scroll to seek out the album you would like to delete, and tap the red icon.
A menu should pop-up from rock bottom of the screen to ask if you’re sure you would like to delete the album. If so, tap “Delete Album” — however, the photos within the album won’t be deleted. they will be found by accessing your Photo Library.
Some third-party apps like WhatsApp create albums in your Photos app whenever you give them permission to access your photo library. Those albums contain anything you’ll have sent, captured, or downloaded within the app.
Deleting a third-party album is straightforward . you’ll do so by following an equivalent steps above.
Why you cannot delete some albums from an iPhone
If you’ve synced your iPhone to iCloud or iTunes, the likelihood is that you can’t delete some photo albums off of your iOS device. Albums that are curated by your iPhone’s Photos app, like “Screenshots” or “Selfies”, can’t be deleted.
However, if you’ve created an album by tapping the “+” button and adding photos thereto yourself, you’re ready to delete it.